I did it! I finally got a REAL Web site created and up online.
I have a great sense of accomplishment.
But, along with that Web site is a section for my blog. So, I will begin posting there and eventually close this one. First I'll need to figure out how to transfer my archived entries and figure out if I can transfer my followers. Also, I need to figure out a few things with the new blog, like how to add a place for comments, add followers and etc.
But I just wanted to let you know and if you'd like to see my latest blog entry here is the LINK
Thanks for your patience and understanding while I have this work in progress. While you are on my blog, take a look at the rest of my Web site and let me know what you think. I already see things I want to change, but hey, it's a start.
Jen
Thursday, February 28, 2013
Wednesday, February 13, 2013
Happy Valentine's Day
The house is decorated in pink. First it was for Evie's 4th Birthday Princess Party, and now it's for Valentine's Day. Slow season for calligraphy, but I've still been trying to stay busy, more on that later.
First I'll show you a Valentine that I made for my hubby last year. It's a small accordian fold card-let because it's not really a book.

The cover is card stock with glittered foam heart on the front and a Glossy Accents heart inside. You can see on my cutting mat that the heart card-let is less than 2 inches tall to give you an idea of size. I used a leftover escort card envelope to put it in.


The long interior accordian part. It was a quick, fun and easy project. Now, I guess I should figure something out for this year.

This is the centerpiece for Evie's party. I bought the pink/purple Christmas ornaments on clearance at Target and put them in a vase. I made tissue paper flowers that were given as favors and made larger ones for the decor, but more on that later.

Prior to the party I had Evie make stamped tube hearts. She's been all about using scissors lately so I had to hide the papers as she wanted to cut them up. I had other plans for the paper. See below.
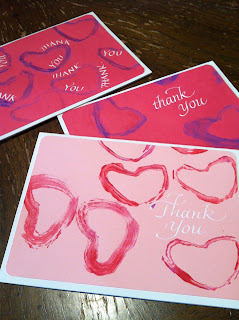
Yes, I ended up cutting them, but, into Thank you cards / Valentine greetings for everyone. Just mailed them today.
I hope everyone has a great Valentine's Day full of pink and hearts.
Jen
Wednesday, December 5, 2012
New ornament styles
Well, since I'm starting to have return clients with additional children or other reasons to need an ornament, I thought it was time to offer some new styles.


This is a new traditional style one. You can purchase this one here

And this my new Winter Wonderland style. This could also be used as a new baby boy ornament. You can purchase this one here. I've also been asked to create a 25th Anniversary ornament, and one for pets. I hope I get to them soon, but we'll see what the holidays bring.
Until next time, and hopefully, sooner rather than later.
Jen
Tuesday, August 21, 2012
Finally an update
Wow, has it really been since March since I last blogged something. Well, I guess it has. Sorry about that. When I've gotten short breaks between work, I've spent some quality time with my family. These included a spring break trip to Gatlinburg, TN, a Memorial Day camping trip, family visiting and going to Kings Island, pool parties, a couple of holidays and so on.
Biggest news is that my 3.5 year old is now potty trained! No more diapers! Woo hooo! Mommy got a raise.
Calligraphically....
Biggest compliment: A local client grilled the stationary shop owner that my writing was so perfect she thought the shop had printed them and charged them for the hand lettering. I loved hearing that, as I'm my own worst critic and always see "boo boos" in my lettering.

Farthest distance client: I addressed the invitations for a client in Austrailia. It was very interesting working internationally. I had to ask the bride about postal regulations and abbreviations for Austrailia. You can see a sample of the lettering above. I printed the return address and RSVP envelopes and did the addressing so everything matched.
New learning: I was asked to copy 2 new fonts this spring/summer. One call Saffron Too for my Austrailian client, and one called Chopin. The second one I really like and want to expand on as I think it is one that could easily be flourished beyond just the letters.


If you have any ideas how I could generate more calligraphy business, let me know.

Best rescue: Suddenly my favorite gold ink wasn't flowing as it should and I was desperate as I just started a lovely wedding that called for gold ink. After sending a call out to my calligraphic community, the conclusion was to order Dr. Martin's copperplate gold ink from Paper and Ink Arts and pay extra for 3 day delivery. Oh. My. Goodness. That was a miracle life saver. I felt like I was actually writing with liquid gold. Recently, I had to order the silver too, for another job on black envelopes. The wonderful lady at Paper and Ink went out of her way to go and unpack a box that had just arrived back from the international calligraphy conference, Calligraphy Northwest, Portland, Oregon, because she knew there was one bottle of the silver ink in it. Both jobs turned out beautifully.
Well, that's enough of an update for now. I hope to get back here soon to show you more work.
Jen
Tuesday, March 13, 2012
I broke out my Rapidiograph pen
One day I posted on my Facebook page that I was searching through my drafting supplies looking for a Rapidiograph pen. I told anyone who knew what that was to holler. A couple people knew, and a shout out to my friend Jan Hurst, who aptly called it “like a Micron only more trouble.”
The project that I was working on was a guest sign in sheet. The bride and groom wanted the monogram from their wedding invitation reproduced on the top of the document. The monogram just happened to be inside of double circles. My first attempt was to just draw the circles freehand. I did not like the result. No matter what I did, it just kept getting worse. You know it’s bad when I bring artwork up for the hubby to look at and give an opinion.
I just didn’t want to do the entire thing over. It was finished, except for those ugly circles. Then I finally realized that I could just do the center circle over, cut it out and paste it on top. But, I still had to find something that I could make a perfect, even circle with. Hubby grabbed various round cups and things looking for the perfect size.
I started searching for my drafting supplies. I found the Rapidiograph and some circle templates, but none were large enough. I took a break. While away from the house, I remembered that I had a circle ruler that I’d bought at a calligraphy conference several years ago. Woo Hoo! I had my solution. Now, to fill that darn pen, but, oh wait, the ink made for the pen was all separated and all that squirted out was something that looked like oil. Ok, so let’s try the Sumi that I used in the rest of the artwork. Ta da! it worked. Suddenly, I could draw perfect circles. Nice.
This is the pen and the now, perfect circle. I once had a job where using a Rapidiograph was a daily occurrence.

Now, to just re-do the inside monogram.

Here is the finished project. I’m extremely pleased with how this guest sign-in sheet turned out and will soon be offering it as
an item in my Etsy shop.

Until next time.
Jen
Monday, March 5, 2012
The year of the butterfly
Evie started preschool last fall. Her class, and all of the classes have cute little names, she happens to be in the butterfly room. And, I guess her fascination with butterflys started almost a year ago. She affectionately calls them ‘fireflys’ and she’ll probably accomplish the ‘B’ sound soon, but for now it’s cute. We did take her to the butterfly show at Khron Conservatory, but the real live critters weren’t to her taste. She did not like that one particular moth decided it liked my shirt and attached itself to me and had to be pried off.
So, it seemed natural that I use butterflys for the theme for her birthday party in January.
Note: I’m way behind on my blog workings, because of a month long bout with the crud going around, but we are all well now, and I’ve got lots to blog about.
So, here are some photos from Evie’s butterfly birthday, that carried on into Valentine’s Day.

This is her birthday invitation. I used a butterfly rubber stamp and then partially cut out the wings and folded them inward to make the card 3-D.

I found a cool butterfly punch to make the cupcake picks. I did try spraying glimmer mist on them, but you can't really see it in the photo. It made them look iridescent. I also folded them, then hot glued them to skewers. This party wasn't as elaborate as in the past, due to said crud.

The guest of honor.

Just after her birthday I discovered Pinterest and found this cool pattern for her Valentines. It was easy, but cutting them all out was time consuming. And, as brilliant as I thought I was, another parent did the same pattern. Oh well, it was fun and as I was signing Evie's name to them she realized that it was her name and promptly spelled it for me. I was very pleasantly surprised that she could spell her own name. Smart girl.
Until next time, when I promise I will get back to calligraphy.
Jen
Tuesday, February 7, 2012
Three years in the making
Yes, this project took 3 years to finish. I started it while I was pregnant with Evie. I wanted to have it done for her nursery.

I bought the letters. Painted the sides of the letters. Picked the scrapbook papers, cut them out and glued them on. Selected some of the embellishments, and then I got stuck.
I couldn’t figure out how I wanted to finish them. Every birthday that rolled around I vowed to get them done. Well, this year, I had some time between Christmas and New Years, and finally decided how and what to do to finish them.
I asked my hubby to show me how to use his Dremel tool because I wanted to rough up / soften the edges of the letters. He put a sanding disc on the tool and I had at it one afternoon. After that I used my brown pan pastels to darken the edges and make them look old. This was the part that I was stuck on. I’d wanted to try to do this in white, but I just didn’t think it would look right.

More recently, I bought one of these 7 Gypsies small trays. They hold one 4x6 photo and has cubbies for other things. This was a small enough project that I thought I could get done in a short amount of time. Sure enough, perfect baby photo, some floral accents, her hospital baby bracelet and a large pink ‘E.’ Done.
The letters are hung by some pink ribbon and the tray rope is from one of her baby shower bags. Yes, I’ve cut up bits and pieces of the baby shower bags to use in scrapbooks, if I ever get caught up enough to work on one.

My calligraphy friends will probably notice the one little thing that will probably bug me forever, but I really didn't see it until I was almost finished. Can you find it? But, I felt a real sense of accomplishment finishing and hanging those darn letters.
Until next time.
Jen
Subscribe to:
Posts (Atom)