I did it! I finally got a REAL Web site created and up online.
I have a great sense of accomplishment.
But, along with that Web site is a section for my blog. So, I will begin posting there and eventually close this one. First I'll need to figure out how to transfer my archived entries and figure out if I can transfer my followers. Also, I need to figure out a few things with the new blog, like how to add a place for comments, add followers and etc.
But I just wanted to let you know and if you'd like to see my latest blog entry here is the LINK
Thanks for your patience and understanding while I have this work in progress. While you are on my blog, take a look at the rest of my Web site and let me know what you think. I already see things I want to change, but hey, it's a start.
Jen
Thursday, February 28, 2013

Wednesday, February 13, 2013
Happy Valentine's Day
The house is decorated in pink. First it was for Evie's 4th Birthday Princess Party, and now it's for Valentine's Day. Slow season for calligraphy, but I've still been trying to stay busy, more on that later.
First I'll show you a Valentine that I made for my hubby last year. It's a small accordian fold card-let because it's not really a book.

The cover is card stock with glittered foam heart on the front and a Glossy Accents heart inside. You can see on my cutting mat that the heart card-let is less than 2 inches tall to give you an idea of size. I used a leftover escort card envelope to put it in.


The long interior accordian part. It was a quick, fun and easy project. Now, I guess I should figure something out for this year.

This is the centerpiece for Evie's party. I bought the pink/purple Christmas ornaments on clearance at Target and put them in a vase. I made tissue paper flowers that were given as favors and made larger ones for the decor, but more on that later.

Prior to the party I had Evie make stamped tube hearts. She's been all about using scissors lately so I had to hide the papers as she wanted to cut them up. I had other plans for the paper. See below.
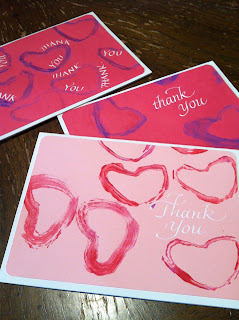
Yes, I ended up cutting them, but, into Thank you cards / Valentine greetings for everyone. Just mailed them today.
I hope everyone has a great Valentine's Day full of pink and hearts.
Jen
First I'll show you a Valentine that I made for my hubby last year. It's a small accordian fold card-let because it's not really a book.

The cover is card stock with glittered foam heart on the front and a Glossy Accents heart inside. You can see on my cutting mat that the heart card-let is less than 2 inches tall to give you an idea of size. I used a leftover escort card envelope to put it in.


The long interior accordian part. It was a quick, fun and easy project. Now, I guess I should figure something out for this year.

This is the centerpiece for Evie's party. I bought the pink/purple Christmas ornaments on clearance at Target and put them in a vase. I made tissue paper flowers that were given as favors and made larger ones for the decor, but more on that later.

Prior to the party I had Evie make stamped tube hearts. She's been all about using scissors lately so I had to hide the papers as she wanted to cut them up. I had other plans for the paper. See below.

Yes, I ended up cutting them, but, into Thank you cards / Valentine greetings for everyone. Just mailed them today.
I hope everyone has a great Valentine's Day full of pink and hearts.
Jen
Wednesday, December 5, 2012
New ornament styles
Well, since I'm starting to have return clients with additional children or other reasons to need an ornament, I thought it was time to offer some new styles.


This is a new traditional style one. You can purchase this one here

And this my new Winter Wonderland style. This could also be used as a new baby boy ornament. You can purchase this one here. I've also been asked to create a 25th Anniversary ornament, and one for pets. I hope I get to them soon, but we'll see what the holidays bring.
Until next time, and hopefully, sooner rather than later.
Jen
Tuesday, August 21, 2012
Finally an update
Wow, has it really been since March since I last blogged something. Well, I guess it has. Sorry about that. When I've gotten short breaks between work, I've spent some quality time with my family. These included a spring break trip to Gatlinburg, TN, a Memorial Day camping trip, family visiting and going to Kings Island, pool parties, a couple of holidays and so on.
Biggest news is that my 3.5 year old is now potty trained! No more diapers! Woo hooo! Mommy got a raise.
Calligraphically....
Biggest compliment: A local client grilled the stationary shop owner that my writing was so perfect she thought the shop had printed them and charged them for the hand lettering. I loved hearing that, as I'm my own worst critic and always see "boo boos" in my lettering.

Farthest distance client: I addressed the invitations for a client in Austrailia. It was very interesting working internationally. I had to ask the bride about postal regulations and abbreviations for Austrailia. You can see a sample of the lettering above. I printed the return address and RSVP envelopes and did the addressing so everything matched.
New learning: I was asked to copy 2 new fonts this spring/summer. One call Saffron Too for my Austrailian client, and one called Chopin. The second one I really like and want to expand on as I think it is one that could easily be flourished beyond just the letters.


If you have any ideas how I could generate more calligraphy business, let me know.

Best rescue: Suddenly my favorite gold ink wasn't flowing as it should and I was desperate as I just started a lovely wedding that called for gold ink. After sending a call out to my calligraphic community, the conclusion was to order Dr. Martin's copperplate gold ink from Paper and Ink Arts and pay extra for 3 day delivery. Oh. My. Goodness. That was a miracle life saver. I felt like I was actually writing with liquid gold. Recently, I had to order the silver too, for another job on black envelopes. The wonderful lady at Paper and Ink went out of her way to go and unpack a box that had just arrived back from the international calligraphy conference, Calligraphy Northwest, Portland, Oregon, because she knew there was one bottle of the silver ink in it. Both jobs turned out beautifully.
Well, that's enough of an update for now. I hope to get back here soon to show you more work.
Jen
Tuesday, March 13, 2012
I broke out my Rapidiograph pen
One day I posted on my Facebook page that I was searching through my drafting supplies looking for a Rapidiograph pen. I told anyone who knew what that was to holler. A couple people knew, and a shout out to my friend Jan Hurst, who aptly called it “like a Micron only more trouble.”
The project that I was working on was a guest sign in sheet. The bride and groom wanted the monogram from their wedding invitation reproduced on the top of the document. The monogram just happened to be inside of double circles. My first attempt was to just draw the circles freehand. I did not like the result. No matter what I did, it just kept getting worse. You know it’s bad when I bring artwork up for the hubby to look at and give an opinion.
I just didn’t want to do the entire thing over. It was finished, except for those ugly circles. Then I finally realized that I could just do the center circle over, cut it out and paste it on top. But, I still had to find something that I could make a perfect, even circle with. Hubby grabbed various round cups and things looking for the perfect size.
I started searching for my drafting supplies. I found the Rapidiograph and some circle templates, but none were large enough. I took a break. While away from the house, I remembered that I had a circle ruler that I’d bought at a calligraphy conference several years ago. Woo Hoo! I had my solution. Now, to fill that darn pen, but, oh wait, the ink made for the pen was all separated and all that squirted out was something that looked like oil. Ok, so let’s try the Sumi that I used in the rest of the artwork. Ta da! it worked. Suddenly, I could draw perfect circles. Nice.
This is the pen and the now, perfect circle. I once had a job where using a Rapidiograph was a daily occurrence.

Now, to just re-do the inside monogram.

Here is the finished project. I’m extremely pleased with how this guest sign-in sheet turned out and will soon be offering it as
an item in my Etsy shop.

Until next time.
Jen
Monday, March 5, 2012
The year of the butterfly
Evie started preschool last fall. Her class, and all of the classes have cute little names, she happens to be in the butterfly room. And, I guess her fascination with butterflys started almost a year ago. She affectionately calls them ‘fireflys’ and she’ll probably accomplish the ‘B’ sound soon, but for now it’s cute. We did take her to the butterfly show at Khron Conservatory, but the real live critters weren’t to her taste. She did not like that one particular moth decided it liked my shirt and attached itself to me and had to be pried off.
So, it seemed natural that I use butterflys for the theme for her birthday party in January.
Note: I’m way behind on my blog workings, because of a month long bout with the crud going around, but we are all well now, and I’ve got lots to blog about.
So, here are some photos from Evie’s butterfly birthday, that carried on into Valentine’s Day.

This is her birthday invitation. I used a butterfly rubber stamp and then partially cut out the wings and folded them inward to make the card 3-D.

I found a cool butterfly punch to make the cupcake picks. I did try spraying glimmer mist on them, but you can't really see it in the photo. It made them look iridescent. I also folded them, then hot glued them to skewers. This party wasn't as elaborate as in the past, due to said crud.

The guest of honor.

Just after her birthday I discovered Pinterest and found this cool pattern for her Valentines. It was easy, but cutting them all out was time consuming. And, as brilliant as I thought I was, another parent did the same pattern. Oh well, it was fun and as I was signing Evie's name to them she realized that it was her name and promptly spelled it for me. I was very pleasantly surprised that she could spell her own name. Smart girl.
Until next time, when I promise I will get back to calligraphy.
Jen
Tuesday, February 7, 2012
Three years in the making
Yes, this project took 3 years to finish. I started it while I was pregnant with Evie. I wanted to have it done for her nursery.

I bought the letters. Painted the sides of the letters. Picked the scrapbook papers, cut them out and glued them on. Selected some of the embellishments, and then I got stuck.
I couldn’t figure out how I wanted to finish them. Every birthday that rolled around I vowed to get them done. Well, this year, I had some time between Christmas and New Years, and finally decided how and what to do to finish them.
I asked my hubby to show me how to use his Dremel tool because I wanted to rough up / soften the edges of the letters. He put a sanding disc on the tool and I had at it one afternoon. After that I used my brown pan pastels to darken the edges and make them look old. This was the part that I was stuck on. I’d wanted to try to do this in white, but I just didn’t think it would look right.

More recently, I bought one of these 7 Gypsies small trays. They hold one 4x6 photo and has cubbies for other things. This was a small enough project that I thought I could get done in a short amount of time. Sure enough, perfect baby photo, some floral accents, her hospital baby bracelet and a large pink ‘E.’ Done.
The letters are hung by some pink ribbon and the tray rope is from one of her baby shower bags. Yes, I’ve cut up bits and pieces of the baby shower bags to use in scrapbooks, if I ever get caught up enough to work on one.

My calligraphy friends will probably notice the one little thing that will probably bug me forever, but I really didn't see it until I was almost finished. Can you find it? But, I felt a real sense of accomplishment finishing and hanging those darn letters.
Until next time.
Jen
Monday, January 16, 2012
Going around in circles
Happy New Year! I hope the new year finds everyone happy and healthy. I’ve been recovering from a cold that has kicked my butt, but other than that all is well.
I’ve made a goal list for this year of things I want to do. But first, as I promised, a little more about Evie’s toddler Spirograph© or Spin n’ Spiral Doodler as Fisher Price calls it.
This is the box as I saw it at my local Target for $19.99.

If you use it as it is set up this is the type or art it makes. The youngster can just watch it create while fun music plays.

But, my Evie wanted a more hands-on experience. So, she lets it spin with or without markers in the holder and draws on the paper. I resisted this at first, but soon realized that she was being creative. So, I helped on some of the pieces.


It comes with a template so you can cut more paper, which is a good thing because we quickly blew through all the paper that came with it in a couple days.
I used my circle cutter to cut out more paper, then used scissors to cut the two notches that hold the paper on the spinner. The old drawing paper was a better quality paper than what came with the toy. The markers tended to bleed on the original paper. Unfortunately, the markers are now just about done, and I found some other markers to use that I had in the studio, but soon found they were not as washable as the originals.
This reminded me....A few years ago I got a spiral ruler from Paper and Ink Arts and I had a blast creating calligraphy in circles. This is a piece I created. Three sets of lowercase alphabets and combines Italic in a circle, folded ruling pen inside the circle and script lettering going across and through the circle. All done on a piece of Twinrocker Handmade paper and is framed in a shadowbox type of frame.
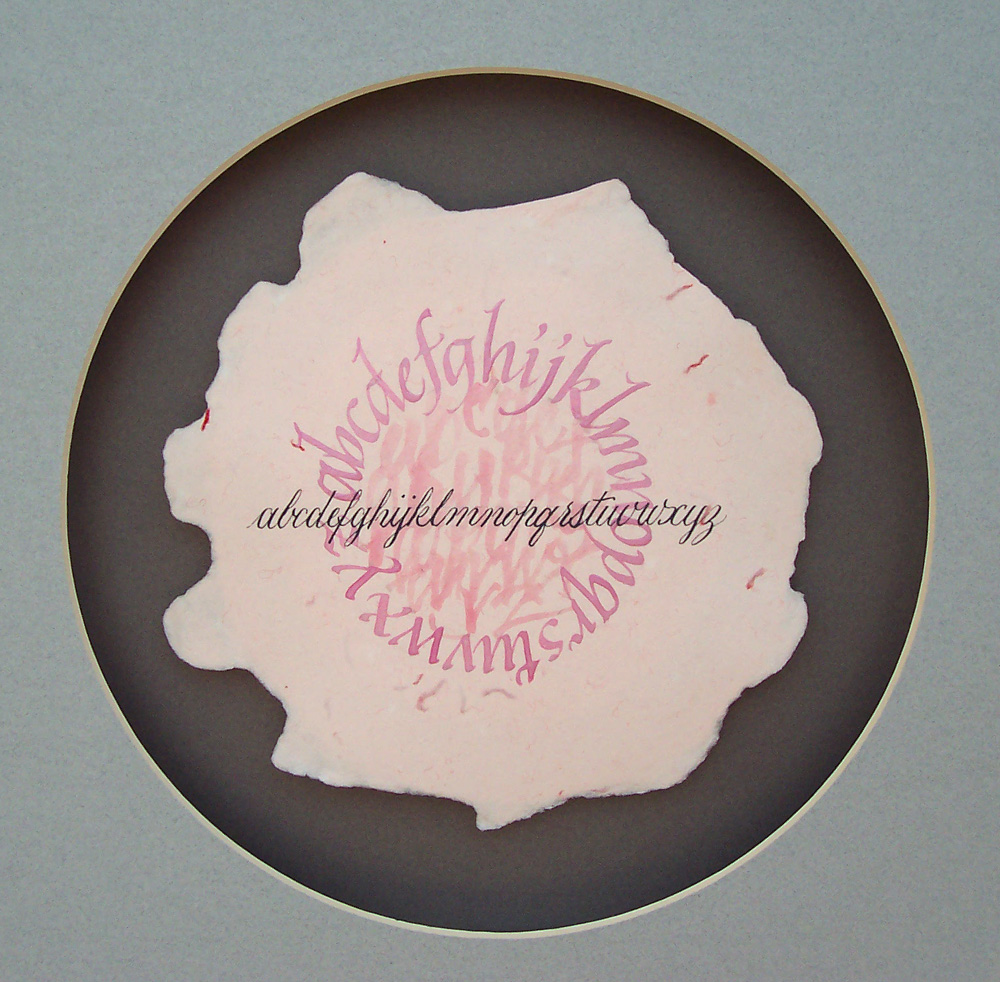
Our guild will be bringing Jane Farr, a calligrapher from Indianapolis, to one of our upcoming meetings and I look forward to working on more circles or Mandala's with her.
Until next time.
Jen
Wednesday, December 28, 2011
Happy Holidays and a cool new toy
Happy Holidays! I hope you and your family and friends are enjoying some down time and togetherness.
Well, I fell way off the blogging band wagon for a while. Sorry about that, life just got too busy.
So, I’m going to tell you about my holiday cards. Yes, I got busy with my Etsy shop, but this year I was a little better prepared, and worked on the cards in a brief slow period sometime in Nov.

The design was swiped from an Archiver’s flyer that I got in the mail, but with my own twist. I rarely ever use the traditional red and green colors for my holiday cards. Mostly because by the time I get around to doing them, all those colors are sold out, so I get something else. I really like kraft paper too, and for several years my cards have had kraft paper used, one way or another. I should do a series on that. Anyway, I found the nice plaid paper and really liked it, and guess what, it was on clearance too.
I’d wanted some sort of gingerbread man image for the tag, but couldn’t find a stamp, sticker or anything else that worked, so, I opted for the star. It was a stencil that I had and I just used an ink pad to ‘stamp’ the star. I experimented with pastels, but this worked best for what I wanted.
All the years that I’ve been doing calligraphy, I’ve been pretty anal about drawing or having guidelines so that I’m sure the lettering is straight. The kraft paper was too thick and dark for me to use on my lightbox, and I didn’t have time to rule each card, so, gulp, I did the lettering freehand.

The lettering is a bit difficult to see what with the pink on the kraft paper, so I’ve tried to lighten it at bit. Some of them look really straight, but some of them went a little crooked. Oh well, that’s life, and I need to practice without lines a lot more, for better results next time.
Evie is almost 3, where did the years go? One of her presents from Santa this Christmas was a toddler version on the Spirograph®. My parents brought me my old Spirograph a few years ago, and I actually used it to create my Holiday cards that year, it’s a fun drawing tool, I wonder if they still make it? Anyway, Evie’s is battery operated and spins for you. She liked the spirals that it made, but then moved onto freehand, letting it spin while she drew. I resisted this, but realized she was being creative and I was having fun with it too. She blew through the 12 sheets of paper that came with it in 2 days, and I’ve been cutting new sheets from some very old, slightly yellowed, drawing paper that my Grandmother had. We’re gonna need new markers soon too, I think.
I don’t have a great photo of it, but I’ll get one to post soon. In the meantime, here’s a little of the Christmas aftermath....

I’ll post some of her artwork soon too. I promise.
Until next time.
Jen
Tuesday, July 26, 2011
Family reunion T-shirt design
So, we are getting ready to leave for a weekend at Virginia Beach. It's what I have been calling a 'mini' family reunion, since it's just us cousins attending. My sister thought it would be neat to make matching T-shirts for everyone. At the time of the original idea I could have had them printed, but life got in the way and I ended up making them.
First I looked for a clip art design that I could alter and add to. I found a couple possibilities, then I created the lettering.
I did the lettering with a folded ruling pen and a Mitchell #4 or 5 nib. I used the colors that I used in the clip art design and Dr. Martin's Tech inks. Dipping in the different colors so they would blend a little.

Next I had to scan the lettering in and manipulate it in Photoshop. The clip art was an Illustrator file that I saved as an eps so that I could open it in Photoshop. I won't get too technical, but here is the final design.

I had purchased white T-shirts for $2 each at Michaels when they were on sale last week. I also used an iron on transfer paper for light fabrics by Jolee's. I was skeptical but had little time for experimentation. The directions said to use an inkjet printer and then iron them on. It was great to load the design onto the Jolee's Website and print from there, because it automatically reversed the design so that it would be right reading once ironed on.
This is the result.

Overall, I'm pretty pleased with how they turned out. The color is great, the lettering and clip art seem to match pretty well, and it was pretty easy to do. Just a little time consuming, but all in all I did the shirts for about $3-$4 each. I can't wait to do our group photo on the beach, oh and thank goodness I only had 18 to do. Ok, 19 since I messed up and got one wrong size shirt. Ugh.
Until next time. Jen
First I looked for a clip art design that I could alter and add to. I found a couple possibilities, then I created the lettering.
I did the lettering with a folded ruling pen and a Mitchell #4 or 5 nib. I used the colors that I used in the clip art design and Dr. Martin's Tech inks. Dipping in the different colors so they would blend a little.

Next I had to scan the lettering in and manipulate it in Photoshop. The clip art was an Illustrator file that I saved as an eps so that I could open it in Photoshop. I won't get too technical, but here is the final design.

I had purchased white T-shirts for $2 each at Michaels when they were on sale last week. I also used an iron on transfer paper for light fabrics by Jolee's. I was skeptical but had little time for experimentation. The directions said to use an inkjet printer and then iron them on. It was great to load the design onto the Jolee's Website and print from there, because it automatically reversed the design so that it would be right reading once ironed on.
This is the result.

Overall, I'm pretty pleased with how they turned out. The color is great, the lettering and clip art seem to match pretty well, and it was pretty easy to do. Just a little time consuming, but all in all I did the shirts for about $3-$4 each. I can't wait to do our group photo on the beach, oh and thank goodness I only had 18 to do. Ok, 19 since I messed up and got one wrong size shirt. Ugh.
Until next time. Jen
Tuesday, June 14, 2011
Escort cards vs. Place cards
Ok, it’s a little embarrassing admitting this, but, lately I’ve noticed brides asking about my doing escort cards. Well, yes, of course I do them, I just have assumed that meant place cards. Then a recent bride had both! I finally had to ask her when I met her what the difference was.
Evidently, escort cards are a card with a table number on it, which is then placed into an envelope with a person or couples name on it. These would be available for pick up at the cocktail portion of the reception.
Place cards are the usual tent (ie: fold in half) cards that are placed at each place setting at the table.
Here are the escort cards and envelopes and place cards that I did for this bride. The font style is Bickham and the lettering was done in navy blue acrylic paint/ink. I love the little pair of gold birds on the escort envelope.

On the agenda for this week: Another wedding job to do, addressing this time. And, I have these creative jewelry ideas in my mind that I need to act on, otherwise, I’ll just keep dreaming about the designs.
Until next time.
Jen
Friday, June 3, 2011
Hair bow hanger #1
It’s been a busy week. Holiday camping for the Indy 500, then out of town family visiting for the week. We have been to Kings Island twice, the zoo and we’re going to Summerfair this afternoon. So, I haven’t had a lot of creative time. I started this a few weeks ago. One of my 2 ideas for a hair bow hanger for Evie’s room.
I haven’t made any more hair clips for her, but I realized that I needed a better way to store / organize / show off the bows. Here are the colors of her room that I was trying to match. Basically, pink and green with lady bugs.


I haven’t made any more hair clips for her, but I realized that I needed a better way to store / organize / show off the bows. Here are the colors of her room that I was trying to match. Basically, pink and green with lady bugs.

I’ve seen bow hangers at a lot of stores and online, and they all pretty much look the same and easy enough to make. So, I put my twist on the idea and came up with this hanger.

I have some heavy aluminum wire from my jewelry making supplies so I made a miniature coat hanger, and attached a ribbon to it. Simple. The whole thing is about 18 inches long, maybe a little too short, but I have another idea brewing.

If you need something to do this weekend, I highly recommend going to Summerfair www.summerfair.org. Lots of wonderful art work to purchase, a kids area, food and music.
Have a great weekend everyone.
Jen
Have a great weekend everyone.
Jen
Monday, May 16, 2011
Place cards and a dress for Evie
Just a touch of calligraphy this week. I did some place cards for a client in Baldwin, NY. I love getting work from all over the U.S. and my Etsy shop has helped me do this.


But, I think the project that I’m most proud of is a dress that I made for Evie.
My old hand-me-down sewing machine, circa 1959, jammed last year when I was making a pillowcase dress for Evie. So, Jeff’s aunt gave me a new hand-me-down sewing machine, circa 1969. I moved up 10 years!

I bought the materials more than a month ago and I’ve been antsy to get working on it. My basic idea was to take a T-shirt, cut off the bottom and add fabric for a skirt to make an empire-style dress.
Preparation was to wash the T-shirt and material. I took the half yard of material, folded it in half, to find the center and marked it with a pin. Then I sewed basting stitches to pull into gathers to fit around the T-shirt. Next I sewed the side seam of the material.

I measured up 7 inches from the bottom of the T-shirt and cut it off about a half inch below that line.
The hardest part was figuring out the inside out, right side, wrong side way of pinning it together so that once sewn, the seam would be on the inside of the dress. Trial and error, and I finally figured it out, but don’t have a photo of that.
So, I sewed it together. Next was figuring out how to decorate the front of the dress. I used a square of the material for the base, which I ironed on instead of sewing. Then, I cut a strip of the T-shirt material and gathered it to make a flower shape. Next, I went to my stash of old/vintage buttons that I’ve had for years and looked for something for the middle of the flower. I found this cute little fish shank button, and sewed it on through the flower.

Next, I hemmed it, and Viola! Here is Evie wearing the finished dress. It's a little big, but I want her to be able to wear it next year too, maybe. If it survives this year.

Thanks for reading, Jen
Friday, May 6, 2011
Whew! All caught up
Whew! I am all caught up on calligraphy work and other freelance work. Quick, do something fun.
So, I did.
My toddler just will not keep a bow clip in her hair. As soon as I put it in, she grabs it out. Only if she is distracted by something else will it stay in for a few minutes. Like in this photo from Easter. Hunting eggs was more fun than than thinking about her bow.

Ok, please ignore the weeds and my hubby video-taping. I'm slowly working on the weeds, but it has been raining here constantly for weeks.
Since she's so good at pulling the bows out, we've lost a few, one last week was lost at Kohl's. So, I decided to see if I could make some bows. They look really easy and I figure I can make some to match her outfits. After doing some online research, I bought some clips and ribbon and fired up my hot glue gun. This is the result.

Another project that I tried was this flower pin.

I found the directions for this on another blog that I came across. The directions were super easy to follow. Here's the link if you'd like to make one. http://obstinatepursuit.blogspot.com/2009/07/fabric-flower-tutorial_03.html

This week I also made Mother's Day bracelet & earring sets for my Mom and Aunt. This is the prototype that I made for myself. The flat discs are a shell of some sort and I've accented them with silver daisy spacers, and Montana blue Swarovski crystal bicones. My aunt's set was in tones of brown/cream with gold accents, and my mom's was black/white/silver. Now, something for my mother-in-law....hmmm, I'll come up with something.
This ended up being a pretty crafty week. I need to get back to some calligraphy fun, and I'm way behind on Evie's scrapbook. I haven't added any pages in over a year. Next rainy day....
Happy May!
Jen
So, I did.
My toddler just will not keep a bow clip in her hair. As soon as I put it in, she grabs it out. Only if she is distracted by something else will it stay in for a few minutes. Like in this photo from Easter. Hunting eggs was more fun than than thinking about her bow.

Ok, please ignore the weeds and my hubby video-taping. I'm slowly working on the weeds, but it has been raining here constantly for weeks.
Since she's so good at pulling the bows out, we've lost a few, one last week was lost at Kohl's. So, I decided to see if I could make some bows. They look really easy and I figure I can make some to match her outfits. After doing some online research, I bought some clips and ribbon and fired up my hot glue gun. This is the result.

Another project that I tried was this flower pin.

I found the directions for this on another blog that I came across. The directions were super easy to follow. Here's the link if you'd like to make one. http://obstinatepursuit.blogspot.com/2009/07/fabric-flower-tutorial_03.html

This week I also made Mother's Day bracelet & earring sets for my Mom and Aunt. This is the prototype that I made for myself. The flat discs are a shell of some sort and I've accented them with silver daisy spacers, and Montana blue Swarovski crystal bicones. My aunt's set was in tones of brown/cream with gold accents, and my mom's was black/white/silver. Now, something for my mother-in-law....hmmm, I'll come up with something.
This ended up being a pretty crafty week. I need to get back to some calligraphy fun, and I'm way behind on Evie's scrapbook. I haven't added any pages in over a year. Next rainy day....
Happy May!
Jen
Monday, April 18, 2011
April showers bring, well....moisture
Spring, it’s finally making it’s way here to Southern Ohio and along with that comes the rain. And our damp / wet basement where my studio is located. Last year, as I was crazy busy in wedding season I suddenly realized that I had a moisture problem and it was affecting the gum on the back of the envelopes. Everything was sticking together and I was panicking. Luckily nothing was ruined, but knew I had a problem that needed addressed.
I asked my hubby to get a de-humidifier to run in the basement. He nixed that idea because it would use too much electricity, almost like running an air conditioner all the time. He’s the one with the certificate in green energy, so I had to listen to him, although not happily.
So, I had to get creative. And here is what I’m doing. First, I am storing envelope jobs that I’m working on in Tupperware® type containers. Second, along with that I put in little packets of silica gel pellets.

You can buy them in the floral dept. of craft stores. I got this 1 1/2 lb. bag at Hobby Lobby for $5.99. (Use one of their 40% off coupons and get it for less, like I did) The pellets are used to dry flowers, and are clear, but they put colored ones in so you can see when they need refreshed. When they have soaked up all the moisture they turn pink. In their dry state they are blue. I put the pellets into pretty little organza bags, and check and change them as needed every day or two while I’m working on a job.

This photo shows the fresh pellets in the organza bags and what they look like when they need refreshed.
When they are all pink, I put them on a cookie sheet in a 250 degree oven for about 45 minutes. They turn blue again and are ready to use, after cooling, of course.
When they are all pink, I put them on a cookie sheet in a 250 degree oven for about 45 minutes. They turn blue again and are ready to use, after cooling, of course.

This photo shows them fresh from my oven and this is almost the entire bag.
Sorry it’s been a while since my last post, I skipped the entire month of March and almost all of April. Ooops. Anyway, gotta get back to work and finish more envelopes.
Evie antics: She is a real outdoor girl. These nice afternoons right after her nap and a cookie break we head outside to play. I try to pull weeds in the landscaping and she helps by giving me handfuls of our landscaping rocks.
Evie antics: She is a real outdoor girl. These nice afternoons right after her nap and a cookie break we head outside to play. I try to pull weeds in the landscaping and she helps by giving me handfuls of our landscaping rocks.
Thanks for reading.
Jen
Jen
Subscribe to:
Posts (Atom)